After I done all the steps below, I put all the other pictures into this KLCC and flag picture. Then I used opacity to make the pictures all look more light and looks more better.
Thanks for reading it. ^^
Thursday, November 27, 2008
The Some Steps of Assignment 1 ( Postcard )
Sorry, due to unidentified problem, I dont know why everytime I tried to post more pictures then the picture turn into corrupted picture. So I post so many posts here.
After I done erasing all the backgrounds, I go to path there I make a new path at my KLCC picture then I go to channel column there and create a new channel for the path.
Then I fit the flag into the path then I blend the flag on to the KLCC picture, then it look like this
After that I erase some part of the flag to make it look like its stick with the KLCC.
The Half of Assignment 1 ( Postcard)
These pictures I take it as my reference.
An old couple riding trishaw.
2. The second step is, after I erase the background, then I change the picture into greyscale mode.
3. I used the same way for the picture of some adorable boys, a malay couple and the hornbill bird.
Malaysia's Flag
Some adorable boys
The KLCC view
Malaysia's Hornbill Bird
A Malay couple
An old couple riding trishaw.
- First step, I take the old couple picture and use the eraser tool to erase the background.
2. The second step is, after I erase the background, then I change the picture into greyscale mode.
3. I used the same way for the picture of some adorable boys, a malay couple and the hornbill bird.
Tuesday, November 25, 2008
My Work for tutorial 2
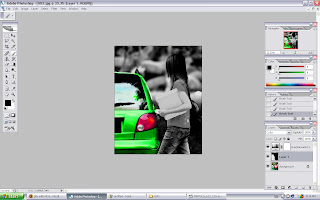
I pick this picture for my tutorial 2 exercise.
I created a new layer to avoid affecting the original image.
Then I use brush tool then i change to default color then i use color mode.
This can make some part of the image become gray color.
So i color the background and the girl.
I leave the car to be in its original color.
Then I use Hue/Saturation mode to make the car color to be more green and striking.
Then it seems to be some of my background is not fully color so I repair the background with the brush.
Then after done repairing, this is how the image look alike.
This is my final work for my tutorial 2 exercise. Thank you for reading my steps.
My Project Charter Assignment 1
Project Charter Assignment 1
Assignment 1 Title: Printout Postcard for the theme “Malaysia, Truly Asia”.
Project Start Date: 24 November 2008
Project Finish Date: 28 November, 2008.
Project Manager: Gan Chong Meng
HP: 012-3887191
Email: mcg1014.1061106592@gmail.com
Website: http://mcg1014-1061106592.blogspot.com
Project Objective: Learning all the technique that I learn from the exercise then apply it to the
postcard based on the title "Malaysia Truly Asia".
Approach:
For this post card, I'm using the photo that i've found from the internet. The link you can search in www.google.com and click the image and all the picture you can find it at there. The tools that i'm using to edit the images is i've sharpen the picture into more celarly and then use the pen tool to draw a path and then cut the image that i want. Then combine everything together. For the other special effect that i will be added, i will consult Mdm.Lydia on how to do it .
Rules and Responsibilities:
Comment:
The difficulties that i'm facing is quite many problem as i've never use phoptoshop before and this is the first time that i was using it . Anyway , i'm enjoy leraning new things and from zero knowledge towards photoshop to become 50% that i've learn now
Assignment 1 Title: Printout Postcard for the theme “Malaysia, Truly Asia”.
Project Start Date: 24 November 2008
Project Finish Date: 28 November, 2008.
Project Manager: Gan Chong Meng
HP: 012-3887191
Email: mcg1014.1061106592@gmail.com
Website: http://mcg1014-1061106592.blogspot.com
Project Objective: Learning all the technique that I learn from the exercise then apply it to the
postcard based on the title "Malaysia Truly Asia".
Approach:
For this post card, I'm using the photo that i've found from the internet. The link you can search in www.google.com and click the image and all the picture you can find it at there. The tools that i'm using to edit the images is i've sharpen the picture into more celarly and then use the pen tool to draw a path and then cut the image that i want. Then combine everything together. For the other special effect that i will be added, i will consult Mdm.Lydia on how to do it .
Rules and Responsibilities:
•After I’ve seen the announcement from the mmls site , I’m thinking of how I’m gonna get a unique idea for represent Malaysia Truly Asia for this topic .
•So, I’m starting to find some picture from the internet. After that I’ve decide to use food to represent Malaysia.
•Then I straight away start to do my work, start to use the tools that I know and compile it.
•Until today 25 November I’ve finished 80 % of my work and some of the technique I need Mdm.Lydia consult me on how to use those technique.Comment:
The difficulties that i'm facing is quite many problem as i've never use phoptoshop before and this is the first time that i was using it . Anyway , i'm enjoy leraning new things and from zero knowledge towards photoshop to become 50% that i've learn now
Wednesday, November 19, 2008
Tutorial 1 Complete
Subscribe to:
Posts (Atom)